Practical IFR: Understanding the Transitions
|
Getting your Trinity Audio player ready...
|
Bozeman Yellowstone International Airport (KBZN) RNAV and ILS 12
In a world of vectors and magenta lines, we rarely sweat the details of transition routes for instrument approaches. Follow the controller’s instructions and the GPS flight plan.
What could go wrong?
Not much when you’re in radar contact and the navigator is working. However, both of those things can drop away without warning, so it’s worth digging into how you bridge the gap between the enroute environment and the final approach course on your own. It’s also an often-overlooked part of the IFR education. Two great charts to study are the RNAV (GPS) Y Rwy 12 and ILS or LOC Rwy 12 at Bozeman, MT (KBZN).
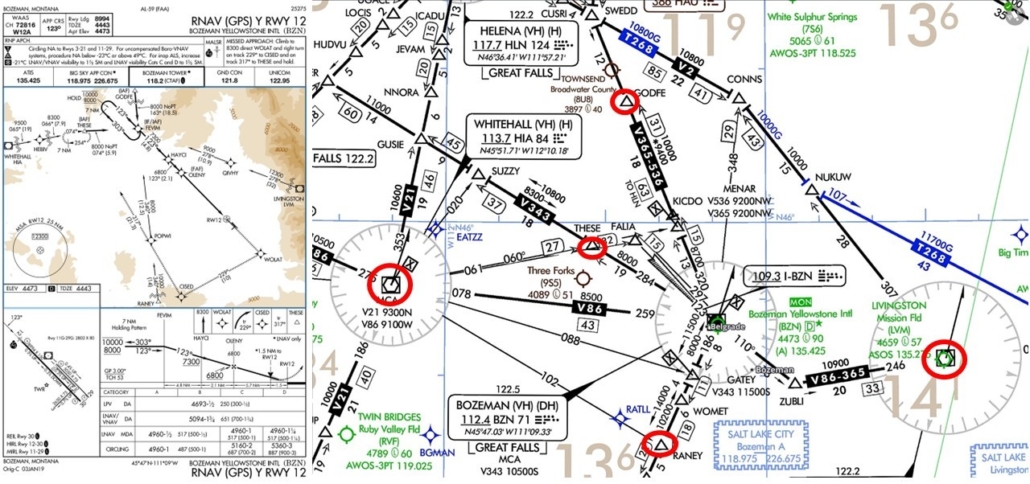
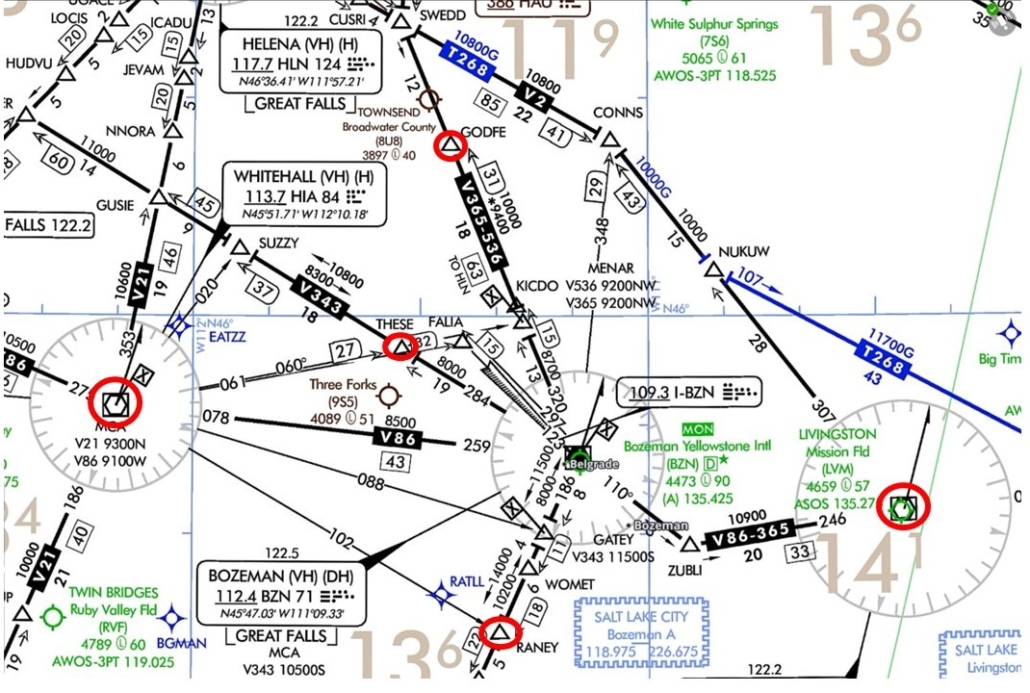
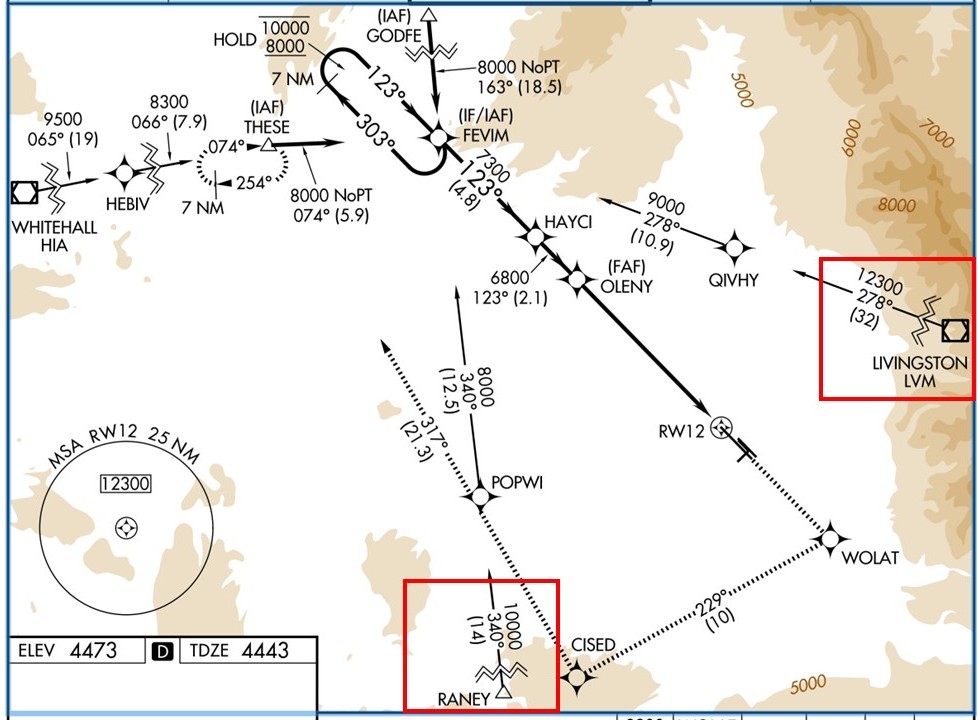
Transitions connect a point in the enroute structure with a point on the approach chart. The RNAV (GPS) Y Rwy 12 has three: The Livingston VOR (LVM), the Whitehall VOR (HIA), and RANEY on V-343. It also has two IAFs that also exist on airways so you can go directly from enroute to approach: THESE on V-343 and GODFE on V-365. So long as one of those five fixes are found along your cleared route, they should be available as a transition from the airway system to the approach.
GODFE and THESE are the simplest: it’s 8000 feet direct to FEVIM, which is a track of 163 and 074, respectively. Note that the 8000 is an at-or-above altitude. If cleared for that transition, and barring any instruction from ATC otherwise, descent to 8000 is at your discretion. That’s why the wavy double line, meaning it’s not to scale, and 18.5 in parenthesis at GODFE are worth noting. It’s 18.5 nm from GODFE to FEVIM, so you’ve got some time to descend. Note to iPad users with georeferenced charts: These discontinuities are not factored into when the airplane symbol appears over them on the chart. Your position is relative to the primary fixes on the approach.
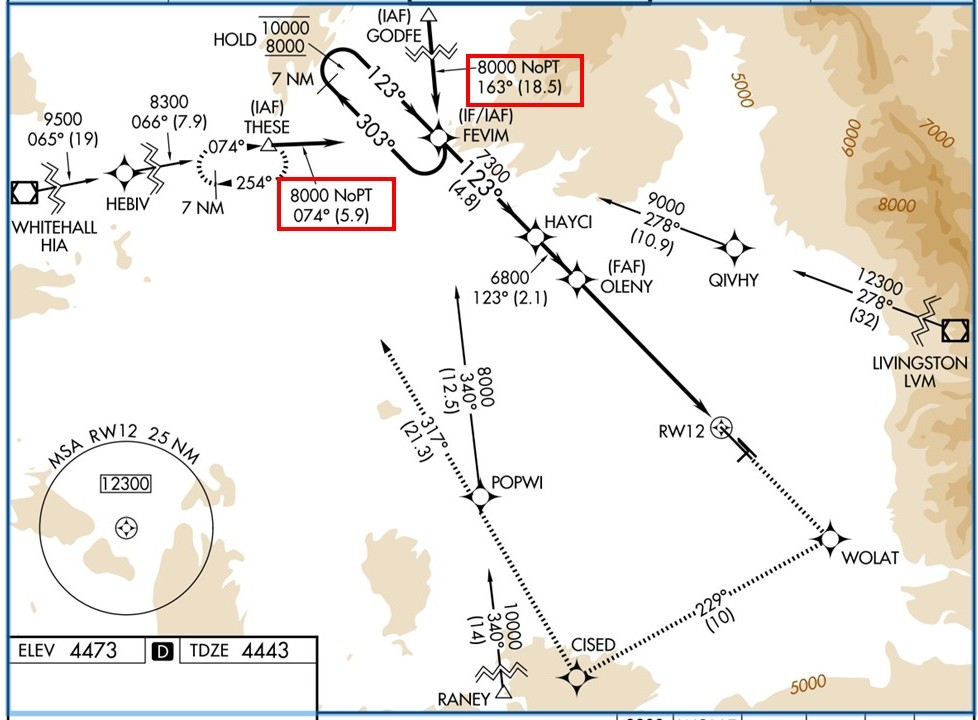
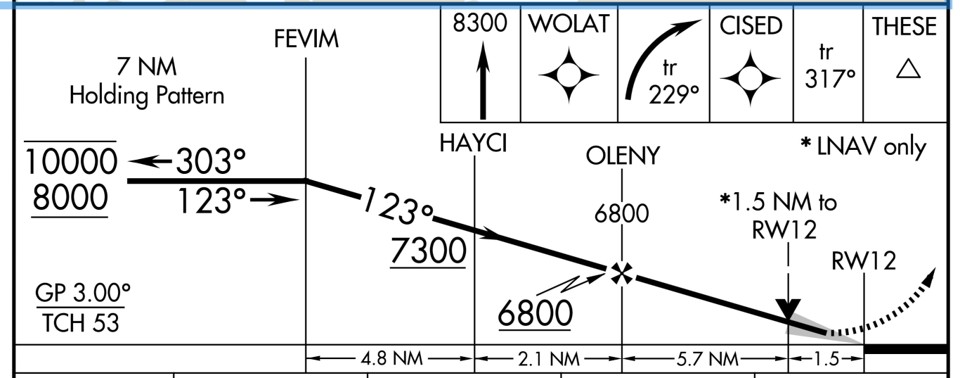
NoPT means you won’t fly the hold-in-lieu-of-procedure-turn (thankfully acronymed HILPT). You’ll simply cross FEVIM and fly a course of 123 to HAYCI at (or above) 7300 feet.
Did you expect the next fix after FEVIM to be OLENY rather than HAYCI? It would be an easy mistake.? The step-down fix HAYCI kinda gets lost in the noise on this approach, which is why we brief approaches and ensure they match the way points listed in the GPS flight plan.
Moving clockwise on the transitions, LVM and RANEY are similar, but include a leg to a secondary RNAV fix (QIVHY and POPWI, respectively), and then direct FEVIM. The headings don’t change between the two legs, so they must be stepdowns for obstacles. Arrivals from these directions require a HILPT at FEVIM. The trip from HIA has three legs, the last of which is the transition from THESE. No surprise here.
The ILS approach is more interesting. There’s a 15-mile transition from the Bozeman VOR (BZN) via R-297 to FALIA, with a HILPT. For equipment, only a basic VHF nav/com and a timer is required. Two VORs would be better, and FALIA is at the intersection of BZN R-297 and HIA R-061. FALIA is shown on the enroute chart with these crossing radials shown, but not with any on-airway route to reach it. Of course, you could use GPS, but that’s not required for this approach.

There’s also a transition from HIA to THESE with two legs. The minimum altitude is 9400 feet for the first 19 miles, denoted by the 19 inside the D-shape (for “distance” or “DME”). The minimum altitude for the next 7.9 miles is 8300 feet. Both legs follow R-060 from the VOR. If you’re using GPS, the fix where you can descend to 8300 feet is HEBIV. (Side note: An older version of this chart had two distance discontinuities and the stepdown was kinda hidden between them. The current version shifted the entire approach to the right in the plan view, perhaps to make that stepdown clearer. Wonder if there’s a story behind that. Maybe an ASRS report too). Because GPS navigation is not required and you might be navigating using VORs, the next intersection, THESE, is defined by R-060 from HIA and R-284 from BZN. Without DME you’d have to maintain 9400 to here, or be pretty confident in your position by time.
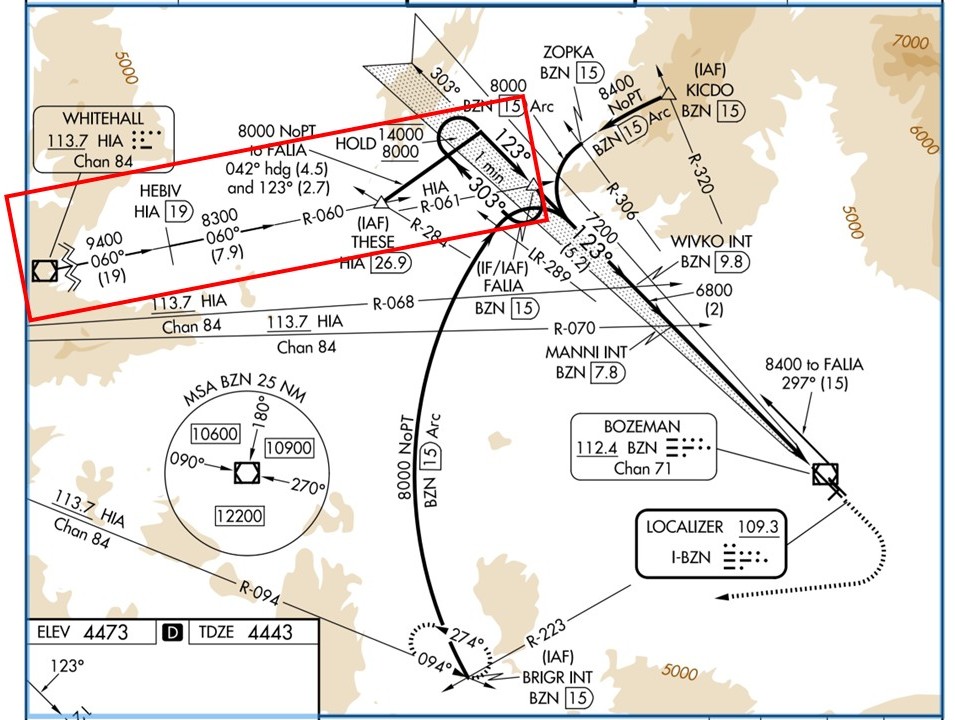
The route THESE to FALIA has a note that requires some parsing: “8000 NoPT to FALIA 042° (4.5) and 123 (2.7).” What’s “123°”? Why that’s the inbound localizer course. The older version of the chart said that. I don’t know what TERPS change mandated the more cryptic course. Maybe they had to keep it interesting after shifting the plan view. With a GPS it doesn’t matter. You’ll see THESE, an intercept point, and FALIA in the flight plan.
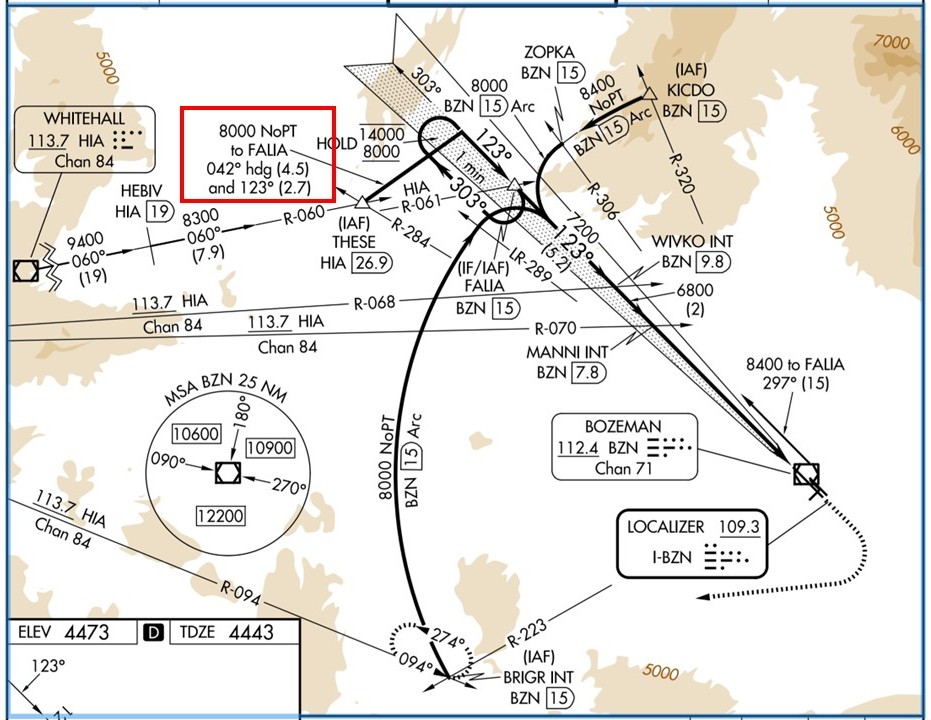
Without GPS, this route is accomplished by flying a heading of 042 and … waiting for the localizer signal. It’s a dead reckoning leg. To keep the dead part from getting too literal, start a timer and know about how long it will take to fly 4.5 miles to intercept the localizer. Go much longer than that and it’s time to execute a Plan B with a climb and a turn towards lower terrain. Once you intercept the localizer, it’s another 2.7 miles to FALIA.
The missed approach has a similar dead reckoning leg. You climb on runway heading to 5200 feet, then turn to a heading of 250 to intercept R-223 from BZN as you continue to climb for 9000 feet to BRIGR.
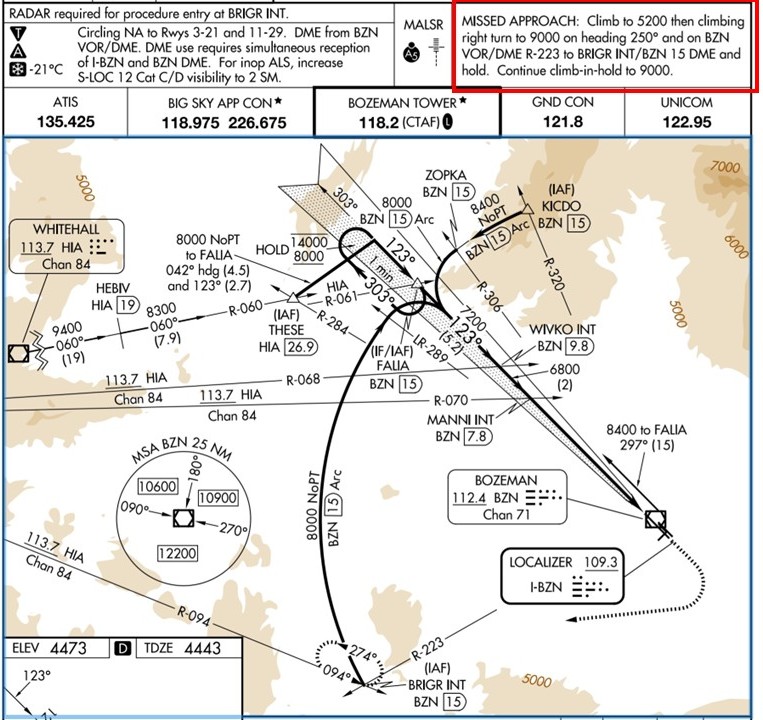
BRIGR is also an initial approach fix (IAF) for this approach, with a DME-arc transition. That old chart (I know, I keep bringing this up) required radar for this fix. That’s because BRIGR isn’t on the enroute chart, so without RNAV a controller would be the only way to find it. I guess they figure everyone has RNAV now, so why waste ink?
If radar coverage was down and you had a GPS, could you fly to BRIGR on your own? Probably not. Off-route clearances require radar coverage (for the most part).
When flying the arc with GPS, you’ll get an annunciation from the navigator when it’s time to turn inbound and intercept the localizer. Without GPS, you might start your turn inbound to the localizer when you cross R-289 from BZN. This is the lead radial, marked “LR-289” on the chart. And, yes, it’s perfectly legal to fly this with one nav/com—as long as you have simultaneous reception of the I-BZN localizer and the BZN DME. That detail is in the chart notes. But then, who actually still has a real DME receiver in light GA? Lead radials get more important the faster you’re moving over the ground. Below 150 knots, you can usually ignore them. That’s true airspeed though. Up here, 150 knots true would be about 125 knots indicated.
There’s also a DME arc from KICDO. There was no radar requirement on the old approach chart, even though you won’t find KICDO on the enroute chart. The key is that KICDO is on R-320 from BZN at 15 miles. R-320 also defines V-365 from BZN. This means KICDO is on V-365 two miles north of MENAR (the one with the crossing restriction flag). It’s typical to find a common named fix on both the enroute chart and the approach chart, but it’s not required if the fix on the chart lies directly on the airway.
This is why details matter. Sometimes it takes a little investigation to understand how all the transitions connect. Make a habit of investigating and you’ll be ready on the off day when you must put that knowledge to use.
The Swiss Army Knife of Flying Math
A Seven Mile Hold? Really?
Both the GPS and Localizer-based approaches to Runway 12 at KBZN have a HILPT (hold in lieu of procedure turn), but they’re defined differently—which makes a huge difference, at least on paper. When a procedure turn is depicted as a hold, you should fly it like a hold. No “creative” turns are allowed. The ILS shows a one-minute leg length, so you’ll follow standard practice and fly outbound for enough time that the leg coming back inbound is about a minute.
The RNAV approach measures the HILPT in distance. These are at least four miles, but the length increases with altitude. This HILPT is seven miles. The GPS guidance will bring you out far enough to fly all seven miles back inbound. That’s a 10-minute course reversal for a typical trainer. You might need long-range fuel tanks.
Except you don’t need to fly all seven. This isn’t a hold, it’s a HILPT. AIM 5-4-9 even allows for this: “… the specified leg length/timing must not be exceeded.” So remain within the bounds of the racetrack and use an approved hold entry, but feel free to cut the distance short and save a little gas. Most GPS navigators even understand and sequence to the next fix automatically.

For 19 years, Jeff ran many noteworthy aviation media projects with his own firm, Van West Communications, including magazines, books, videos and live seminars. Jeff previously served as editor-in-chief of IFR Magazine and co-editor of Aviation Consumer, and his work appears in AOPA Pilot, Flight Training Magazine, Plane and Pilot, and AVweb. He’s an experienced CFII/MEI with ratings for single- and multi-engine airplanes, seaplanes, and gliders. Jeff was the creator of the first pilot transition program for new Cirrus aircraft.
- Practical IFR: Decision Time - February 17, 2026
- Practical IFR: Understanding the Transitions - January 20, 2026
- Practical IFR: Departure Alternates - December 16, 2025
I believe DMEs are a great tool, even though many planes are equipped with IFR GPS navigators. They have no subscription costs, no data bases to update, they read nearly instantly once tuned, and they are a great second opinion to compare to GPS position. I have had numerous GPS failures due to many different reasons such as failed datacards, antenna and antenna cable failures, RF interference or jamming, faulty power or ground wiring, and screen and button failures. If you have one, don’t take it out. If you don’t have one, a used one can be purchased and installed for a modest cost.
Jeff
Good discussion on BZN approaches. I have one question not related to just BZN. When briefing an approach does the FAA expect only one approach briefed or can a back up approach/fall position be part of the original briefing?
For example: RNAV(GPS)Y Rwy 12 BZN has LPV minimums, should the pilot get WAAS failure notification does the FAA allow continuing the approach by reverting to LNAV/VNAV minimums or does the FAA require a missed approach?
The Air Force allows two approaches/minimums to be briefed, at one airline I know only one approach and minimum can be briefed at a time. What is the FAA’s current position on this question and might you have a document reference?
Thank you for your contributions to flying safety.
You’re free to revert to different minimums on any approach at any time, so long as you haven’t already descended below them. The FAA has no requirement or prohibition on briefing more than one set before flying the approach. Nor is there a requirement to have pre-briefed if you change the plan well past the final approach fix.
You might want to set some SOPs and hard limits for yourself though.
I do see KICDO on the enroute chart, don’t I?
Indeed it is now. When this article was first published, it wasn’t. Someone must have complained. ;-)