Welcome to the latest edition of the Instrument Maneuver Spotlight series. Here we’ll highlight the various maneuvers you’ll practice during your instrument training and be expected to demonstrate during your checkride.
When ATC takes control of your headings and altitudes, precision and anticipation are key. In this spotlight, we’ll cover how to fly an instrument approach using radar vectors from ATC—maintaining communication discipline, staying ahead of the airplane, and managing configuration and speed changes.
Each maneuver is part of Sporty’s Instrument Rating Course and includes a narrated video animation, along with step-by-step instructions that include performance standards and common errors. Study them while on the ground or print them for quick reference in the airplane.
They say automation breeds bad habits, but I think automation training is where the blame lies.
Here’s one beef: What should you do when the autopilot fails to capture the glideslope or turns right when you expected left?
You should disengage the autopilot and hand-fly, right?
Wrong. Wrong. Wrong.
Think about this objectively for a moment. Right at a critical moment in the approach, you’ve been hit with a surprise, so you double your workload by throwing out one of your best IFR tools. You do it right when a precise flying action is required. And you’re distracted because part of your attention is off thinking, “Why did the autopilot do that?”
But Disengaging is Easier
Yes, disengaging the autopilot is the “easiest” way to fix the situation, and that’s the problem.
It’s easier because we rarely do what I’ll call “Reversion Training.”
With one exception (which we’ll talk about in a moment), I have yet to see an autopilot surprise anybody in heading and basic altitude mode. (If it does, the thing is probably broken, and then we’re in agreement it should be turned off.) The reason is simply that heading mode and simple altitude or vertical speed hold are direct commands for performance. Fly left. Go down. Stay here.
This means that even in a critical moment, using these simplified functions should be an easy way to command your aircraft without abandoning the autopilot assistance altogether. When the more complex navigation or approach modes let you down (usually because something was entered incorrectly or too late), revert to the simpler heading and altitude modes and put the airplane where you want it. You know where the aircraft should go, or you wouldn’t be complaining the autopilot is misbehaving.
Building this habit of reverting down one level of automation takes a little practice. We have to break the red-button-disconnect habit, and we must build some skill using heading mode for more than vectors.
Step one is probably changing how you engage your autopilot. Do you go straight from hand flying to NAV mode where George follows the pretty magenta line? Don’t.
Instead, start with a Roll-and-Pitch hold mode if you have it. Essentially that’s the simplest autopilot mode of all and it’s easy to see if it’s working. When you engage roll and pitch holds and release the yoke, nothing should change.
The next step up is Heading Mode with a selected Vertical Speed or Altitude Hold (or just trim if you have only one axis of AP control). How’s that working? Great, basic autopilot modes are working. Now you can take the last step up to advanced navigation modes like GPSS, NAV, and VNAV.
Making a practice of stepping up lays the foundation for stepping back down when you need to. Part two is practicing entire approaches using just the heading bug and basic vertical speed control. It’s not hard. In fact, it’s kind of fun, but it takes some practice. You should be completely comfortable flying both ILS and LPV approaches with a continuous descent and non-precision approaches with level-offs and power changes using HDG, VS and/or ALT, and the throttle(s). Yes, you must also be comfortable hand flying approaches in case the autopilot completely fails, but that’s a different article.
There’s one other habit that’s useful for many reasons, but essential here. Make a habit of syncing your heading bug to your current heading on a regular basis, even if the bug isn’t in use.
The one time reverting catches people off guard is when they engage the autopilot HDG mode without realizing the heading bug is 110 degrees to the left. The aircraft dutifully rolls off toward the bug as the pilot makes a mad scramble to the swing the bug back forward.
To successfully and smoothly revert, you must have these details covered. Master that, and a misbehaving autopilot is almost boring.
Watch This Video:
“How to Fly a Flight Director”
Hand-Flying the Easy Parts
The simple fact is you get good at hand-flying an aircraft by … hand-flying an aircraft.
Something you notice watching many pilots fly is that few have trouble hand-flying when they’re focused on the gauges. The actual motor skill is not the weak part. The weakness is in split attention.
Out-of-practice pilots get into trouble because they’ve lost the skill of maintaining a pervasive and constant awareness of the flight instruments while they do other tasks.
Here’s a good exercise for that: Don’t use the autopilot in cruise. Use it for climbs or descents as you get ready for approaches if you want. Use it for at least some approaches as well. But when things get boring, turn it off. Your mind will naturally wander—forcing you to practice continually checking back to the flight instruments. Regularly reinforce hand-flying skill when life is relaxed, and it’ll be there for you when things get busy.
https://media.ifrfocus.com/wp-content/uploads/2025/10/08121957/Practical-IFR-Dont-Disable.-Revert.png10001250Jeff Van Westhttps://media.ifrfocus.com/wp-content/uploads/2025/07/14115136/IFR-Focus-Logo_White_Blue_Web-01.pngJeff Van West2025-10-14 08:55:092025-10-10 12:20:44Practical IFR: Don’t Disable. Revert!
There are many details to consider when planning a flight under Instrument Flight Rules. Mix in some inclement weather, and the workload increases exponentially. Answer all these questions correctly and prove you have the keys to unlock a successful IFR flight.
1. An airport may not be qualified for alternate use when filing an IFR flight plan if
Correct!Wrong!
2. How many precision approach procedures are published for William P Hobby Airport?
Correct!Wrong!
3. You are planning an IFR flight off established airways below 18,000 ft MSL. If you use VOR navigation to define the route, the maximum distance between NAVAIDS should be
Correct!Wrong!
4. Preferred IFR routes beginning with a fix, indicate that departing aircraft will normally be routed to the fix by
Correct!Wrong!
5. What service is provided by departure control to an IFR flight when operating within Class C airspace?
Correct!Wrong!
6. Your transponder is inoperative. What are the requirements for flying in Class D airspace?
Correct!Wrong!
8. ATC has approved your request for VFR-on-top while on an IFR clearance. Therefore, you
Correct!Wrong!
9. What does declaring 'minimum fuel' to ATC imply?
Correct!Wrong!
10. How can you determine if the destination airport has non-standard IFR alternate minimums?
This is a question that comes up a lot, and it’s a perfect example of how IFR technology gives us more options—but also more decisions to make. Let’s break it down.
LPV vs. ILS—The Basics
An ILS is the classic precision approach, with a localizer for lateral guidance and a glideslope for vertical guidance. It’s reliable, predictable, and widely used around the world.
An LPV (Localizer Performance with Vertical guidance) is a GPS-based approach using WAAS. It gives you precision-like vertical guidance and often lower minimums than older non-WAAS GPS approaches. LPVs can even match or beat ILS minimums in some cases.
Pilot Perspective
Weather Minimums: Always check the published minima. If the LPV offers a lower minimum or better runway alignment than the ILS, it might be the safer option in low weather—but only if you and your aircraft are equipped and comfortable flying it.
Familiarity: In high workload situations, some pilots find the ILS easier to fly simply because it’s familiar and predictable.
Missed Approaches: LPV missed approaches can be more flexible, but always review the procedure. ILS missed approaches are well-established and widely flown.
ATC Perspective
From ATC’s point of view, LPV and ILS are largely interchangeable. However, they might favor an ILS in busy airspace because the procedure is predictable and familiar, helping with sequencing. In tricky, unfamiliar or challenging terrain, LPVs can sometimes offer safer vertical guidance.
What to Choose
Both LPV and ILS are highly capable precision approaches. Your choice should be guided by your equipment, training, familiarity, and current weather. LPV isn’t automatically “better” than an ILS—it’s another tool in your IFR toolbox. Always check your charts (and notes), know your aircraft, and communicate with ATC if you have a preference.
https://media.ifrfocus.com/wp-content/uploads/2025/10/01110037/Ask-an-IFR-Expert-LPV-vs.-ILS%E2%80%94Which-Should-You-Fly-in-Low-Weather.png10001250Eric Radtkehttps://media.ifrfocus.com/wp-content/uploads/2025/07/14115136/IFR-Focus-Logo_White_Blue_Web-01.pngEric Radtke2025-10-07 08:55:102025-10-01 11:01:28Ask an IFR Expert: LPV vs. ILS—Which Should You Fly in Low Weather?
For many IFR pilots today, flying a GPS approach is second nature. Among the most capable options is the LPV approach, which offers ILS-like lateral and vertical guidance—but with far wider availability. Thanks to WAAS-enabled GPS, pilots can fly precision-style approaches at thousands of airports that don’t have an ILS installed.
In this video tip from Sporty’s Instrument Rating Course, we’ll break down the key differences between a GPS LNAV and LPV approach, and demonstrate step-by-step how to fly an LPV using the Garmin GTN 650 navigator.
Ready to sharpen your IFR skills even further? Sporty’s Instrument Rating Course combines over 13 hours of in-flight HD training with powerful written test prep tools—everything you need to build confidence and earn your rating.
https://media.ifrfocus.com/wp-content/uploads/2025/09/26093023/Video-Tip-How-to-Fly-an-LPV-Approach-with-a-Garmin-GTN-650.png10001250IFR Focus Teamhttps://media.ifrfocus.com/wp-content/uploads/2025/07/14115136/IFR-Focus-Logo_White_Blue_Web-01.pngIFR Focus Team2025-10-03 08:55:402025-10-03 09:21:11Video Tip: How to Fly an LPV Approach with a Garmin GTN 650
Scenario Picture this: you’re flying an ILS approach right down to the absolute minimums. At 200 feet above the ground, the only thing you can see are the approach lights flashing through the fog. You quickly run through FAR 91.175 in your head and remind yourself: yep, this means you’re allowed to keep going down to 100 feet above the touchdown zone.
As you pass through 100 feet AGL, the runway threshold and touchdown zone lights start to poke through the fog—just enough to line things up. You glance left to check the PAPI and, at the same time, keep an eye on your instruments. That’s when you notice something weird: the glideslope says you’re right on path, but the PAPI shows you’re just a little low.
So now you’ve got a decision to make: • Do you trust the instruments and continue to land? • Or do you play it safe and go around?
Hard IFR vs. the Checkride This is where real-world IFR flying separates itself from the checkride. The ride feels almost scripted: constant vectors to final, the same familiar approaches, and airports you’ve probably flown into before, even in VFR. You usually know the terrain, the obstacles, and what to expect.
But out in the real world, you don’t always get that luxury. Sometimes you’re flying into an unfamiliar airport, with little margin for error, and the only thing that keeps you ahead of the airplane is a solid approach briefing. And that briefing really should start well before you even sit down in the cockpit.
Why the Notes Section Matters One of the most overlooked parts of the approach plate is the notes section. A lot of pilots skim right past it, but that’s where some of the most important “gotchas” are hiding—the limitations, restrictions, and curveballs that could turn an otherwise normal approach into an unexpected go-around.
If you take just a little extra time to brief those notes, you’ll head into the approach with clear expectations, less confusion, and fewer last-second decisions when workload is already maxed out.
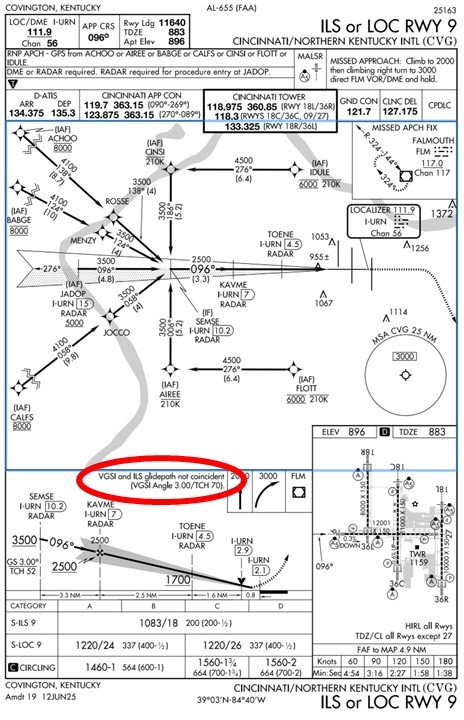
Turning Notes into Action One of the easiest examples is when you see:
“VGSI and ILS glidepath not coincident.”
I’ve heard plenty of pilots brief that by simply reading the words out loud, but that doesn’t really prepare you for what it means when you break out. A better way is to dig a little deeper. Compare the threshold crossing height (TCH) of the VGSI (like the PAPI or VASI) with the TCH listed for the ILS glideslope in the profile view.
Now you can brief it with actual meaning:
“The VGSI and ILS glidepath are not coincident. The glideslope TCH is 54 feet, while the VGSI is 70 feet. When we break out, I expect to see three red and one white on the PAPI if we’re on the ILS glidepath. If I see that, we continue. But if I see four reds, that’s an immediate go-around.”
The Payoff See the difference? By briefing exactly what you expect to see, you’ve removed uncertainty from the picture. You know what’s normal, you know what’s not, and you know what action to take. That’s how you avoid hesitation in a high-stress, low-visibility moment. Instead of just reading a note, you’ve turned it into a practical risk management tool.
👉 Want a simple way to make your own approach briefings clear and organized? Check out this video where I walk through the ILS10R Approach into the Columbus International Airport (KCMH). Use it as a template the next time you fly IFR, and you’ll never look at the notes section the same way again.
https://media.ifrfocus.com/wp-content/uploads/2025/09/24123434/Copy-of-whats-wrong.png10001250James Oniealhttps://media.ifrfocus.com/wp-content/uploads/2025/07/14115136/IFR-Focus-Logo_White_Blue_Web-01.pngJames Onieal2025-09-30 08:55:492025-10-03 13:51:50Don’t Just Read the Notes—Use Them
Instrument Maneuver Spotlight: Radar Vectored Instument Approach
/by IFR Focus TeamWelcome to the latest edition of the Instrument Maneuver Spotlight series. Here we’ll highlight the various maneuvers you’ll practice during your instrument training and be expected to demonstrate during your checkride.
When ATC takes control of your headings and altitudes, precision and anticipation are key. In this spotlight, we’ll cover how to fly an instrument approach using radar vectors from ATC—maintaining communication discipline, staying ahead of the airplane, and managing configuration and speed changes.
Each maneuver is part of Sporty’s Instrument Rating Course and includes a narrated video animation, along with step-by-step instructions that include performance standards and common errors. Study them while on the ground or print them for quick reference in the airplane.
Practical IFR: Don’t Disable. Revert!
/by Jeff Van WestThey say automation breeds bad habits, but I think automation training is where the blame lies.
Here’s one beef: What should you do when the autopilot fails to capture the glideslope or turns right when you expected left?
You should disengage the autopilot and hand-fly, right?
Wrong. Wrong. Wrong.
Think about this objectively for a moment. Right at a critical moment in the approach, you’ve been hit with a surprise, so you double your workload by throwing out one of your best IFR tools. You do it right when a precise flying action is required. And you’re distracted because part of your attention is off thinking, “Why did the autopilot do that?”
But Disengaging is Easier
Yes, disengaging the autopilot is the “easiest” way to fix the situation, and that’s the problem.
It’s easier because we rarely do what I’ll call “Reversion Training.”
With one exception (which we’ll talk about in a moment), I have yet to see an autopilot surprise anybody in heading and basic altitude mode. (If it does, the thing is probably broken, and then we’re in agreement it should be turned off.) The reason is simply that heading mode and simple altitude or vertical speed hold are direct commands for performance. Fly left. Go down. Stay here.
This means that even in a critical moment, using these simplified functions should be an easy way to command your aircraft without abandoning the autopilot assistance altogether. When the more complex navigation or approach modes let you down (usually because something was entered incorrectly or too late), revert to the simpler heading and altitude modes and put the airplane where you want it. You know where the aircraft should go, or you wouldn’t be complaining the autopilot is misbehaving.
Building this habit of reverting down one level of automation takes a little practice. We have to break the red-button-disconnect habit, and we must build some skill using heading mode for more than vectors.
Step one is probably changing how you engage your autopilot. Do you go straight from hand flying to NAV mode where George follows the pretty magenta line? Don’t.
Instead, start with a Roll-and-Pitch hold mode if you have it. Essentially that’s the simplest autopilot mode of all and it’s easy to see if it’s working. When you engage roll and pitch holds and release the yoke, nothing should change.
The next step up is Heading Mode with a selected Vertical Speed or Altitude Hold (or just trim if you have only one axis of AP control). How’s that working? Great, basic autopilot modes are working. Now you can take the last step up to advanced navigation modes like GPSS, NAV, and VNAV.
Making a practice of stepping up lays the foundation for stepping back down when you need to. Part two is practicing entire approaches using just the heading bug and basic vertical speed control. It’s not hard. In fact, it’s kind of fun, but it takes some practice. You should be completely comfortable flying both ILS and LPV approaches with a continuous descent and non-precision approaches with level-offs and power changes using HDG, VS and/or ALT, and the throttle(s). Yes, you must also be comfortable hand flying approaches in case the autopilot completely fails, but that’s a different article.
There’s one other habit that’s useful for many reasons, but essential here. Make a habit of syncing your heading bug to your current heading on a regular basis, even if the bug isn’t in use.
The one time reverting catches people off guard is when they engage the autopilot HDG mode without realizing the heading bug is 110 degrees to the left. The aircraft dutifully rolls off toward the bug as the pilot makes a mad scramble to the swing the bug back forward.
To successfully and smoothly revert, you must have these details covered. Master that, and a misbehaving autopilot is almost boring.
Watch This Video:
“How to Fly a Flight Director”
Hand-Flying the Easy Parts
The simple fact is you get good at hand-flying an aircraft by … hand-flying an aircraft.
Something you notice watching many pilots fly is that few have trouble hand-flying when they’re focused on the gauges. The actual motor skill is not the weak part. The weakness is in split attention.
Out-of-practice pilots get into trouble because they’ve lost the skill of maintaining a pervasive and constant awareness of the flight instruments while they do other tasks.
Here’s a good exercise for that: Don’t use the autopilot in cruise. Use it for climbs or descents as you get ready for approaches if you want. Use it for at least some approaches as well. But when things get boring, turn it off. Your mind will naturally wander—forcing you to practice continually checking back to the flight instruments. Regularly reinforce hand-flying skill when life is relaxed, and it’ll be there for you when things get busy.
Quiz: Preflight Planning an IFR Flight
/by IFR Focus TeamThere are many details to consider when planning a flight under Instrument Flight Rules. Mix in some inclement weather, and the workload increases exponentially. Answer all these questions correctly and prove you have the keys to unlock a successful IFR flight.
Share the quiz to show your results !
Facebook
Facebook
Share your results :
Facebook
Facebook
Twitter
Google+
Want to learn more about IFR flight planning? Check out Sporty’s Instrument Rating Course for more in-depth training on this subject.
Ask an IFR Expert: LPV vs. ILS—Which Should You Fly in Low Weather?
/by Eric RadtkeThis is a question that comes up a lot, and it’s a perfect example of how IFR technology gives us more options—but also more decisions to make. Let’s break it down.
LPV vs. ILS—The Basics
An ILS is the classic precision approach, with a localizer for lateral guidance and a glideslope for vertical guidance. It’s reliable, predictable, and widely used around the world.
An LPV (Localizer Performance with Vertical guidance) is a GPS-based approach using WAAS. It gives you precision-like vertical guidance and often lower minimums than older non-WAAS GPS approaches. LPVs can even match or beat ILS minimums in some cases.
Pilot Perspective
Weather Minimums: Always check the published minima. If the LPV offers a lower minimum or better runway alignment than the ILS, it might be the safer option in low weather—but only if you and your aircraft are equipped and comfortable flying it.
Familiarity: In high workload situations, some pilots find the ILS easier to fly simply because it’s familiar and predictable.
Missed Approaches: LPV missed approaches can be more flexible, but always review the procedure. ILS missed approaches are well-established and widely flown.
ATC Perspective
From ATC’s point of view, LPV and ILS are largely interchangeable. However, they might favor an ILS in busy airspace because the procedure is predictable and familiar, helping with sequencing. In tricky, unfamiliar or challenging terrain, LPVs can sometimes offer safer vertical guidance.
What to Choose
Both LPV and ILS are highly capable precision approaches. Your choice should be guided by your equipment, training, familiarity, and current weather. LPV isn’t automatically “better” than an ILS—it’s another tool in your IFR toolbox. Always check your charts (and notes), know your aircraft, and communicate with ATC if you have a preference.
Video Tip: How to Fly an LPV Approach with a Garmin GTN 650
/by IFR Focus TeamFor many IFR pilots today, flying a GPS approach is second nature. Among the most capable options is the LPV approach, which offers ILS-like lateral and vertical guidance—but with far wider availability. Thanks to WAAS-enabled GPS, pilots can fly precision-style approaches at thousands of airports that don’t have an ILS installed.
In this video tip from Sporty’s Instrument Rating Course, we’ll break down the key differences between a GPS LNAV and LPV approach, and demonstrate step-by-step how to fly an LPV using the Garmin GTN 650 navigator.
Ready to sharpen your IFR skills even further? Sporty’s Instrument Rating Course combines over 13 hours of in-flight HD training with powerful written test prep tools—everything you need to build confidence and earn your rating.
Don’t Just Read the Notes—Use Them
/by James OniealScenario
Picture this: you’re flying an ILS approach right down to the absolute minimums. At 200 feet above the ground, the only thing you can see are the approach lights flashing through the fog. You quickly run through FAR 91.175 in your head and remind yourself: yep, this means you’re allowed to keep going down to 100 feet above the touchdown zone.
As you pass through 100 feet AGL, the runway threshold and touchdown zone lights start to poke through the fog—just enough to line things up. You glance left to check the PAPI and, at the same time, keep an eye on your instruments. That’s when you notice something weird: the glideslope says you’re right on path, but the PAPI shows you’re just a little low.
So now you’ve got a decision to make:
• Do you trust the instruments and continue to land?
• Or do you play it safe and go around?
Hard IFR vs. the Checkride
This is where real-world IFR flying separates itself from the checkride. The ride feels almost scripted: constant vectors to final, the same familiar approaches, and airports you’ve probably flown into before, even in VFR. You usually know the terrain, the obstacles, and what to expect.
But out in the real world, you don’t always get that luxury. Sometimes you’re flying into an unfamiliar airport, with little margin for error, and the only thing that keeps you ahead of the airplane is a solid approach briefing. And that briefing really should start well before you even sit down in the cockpit.
Why the Notes Section Matters
One of the most overlooked parts of the approach plate is the notes section. A lot of pilots skim right past it, but that’s where some of the most important “gotchas” are hiding—the limitations, restrictions, and curveballs that could turn an otherwise normal approach into an unexpected go-around.
If you take just a little extra time to brief those notes, you’ll head into the approach with clear expectations, less confusion, and fewer last-second decisions when workload is already maxed out.
Turning Notes into Action
 One of the easiest examples is when you see:
I’ve heard plenty of pilots brief that by simply reading the words out loud, but that doesn’t really prepare you for what it means when you break out. A better way is to dig a little deeper. Compare the threshold crossing height (TCH) of the VGSI (like the PAPI or VASI) with the TCH listed for the ILS glideslope in the profile view.
Now you can brief it with actual meaning:
The Payoff
See the difference? By briefing exactly what you expect to see, you’ve removed uncertainty from the picture. You know what’s normal, you know what’s not, and you know what action to take. That’s how you avoid hesitation in a high-stress, low-visibility moment. Instead of just reading a note, you’ve turned it into a practical risk management tool.
👉 Want a simple way to make your own approach briefings clear and organized? Check out this video where I walk through the ILS10R Approach into the Columbus International Airport (KCMH). Use it as a template the next time you fly IFR, and you’ll never look at the notes section the same way again.